Last year I knitted a lovely bag in Drops Eskimo and then felted it. The bag was so popular and I sold lots of the yarn and the pattern. This year I’ve decided to crochet a bag.
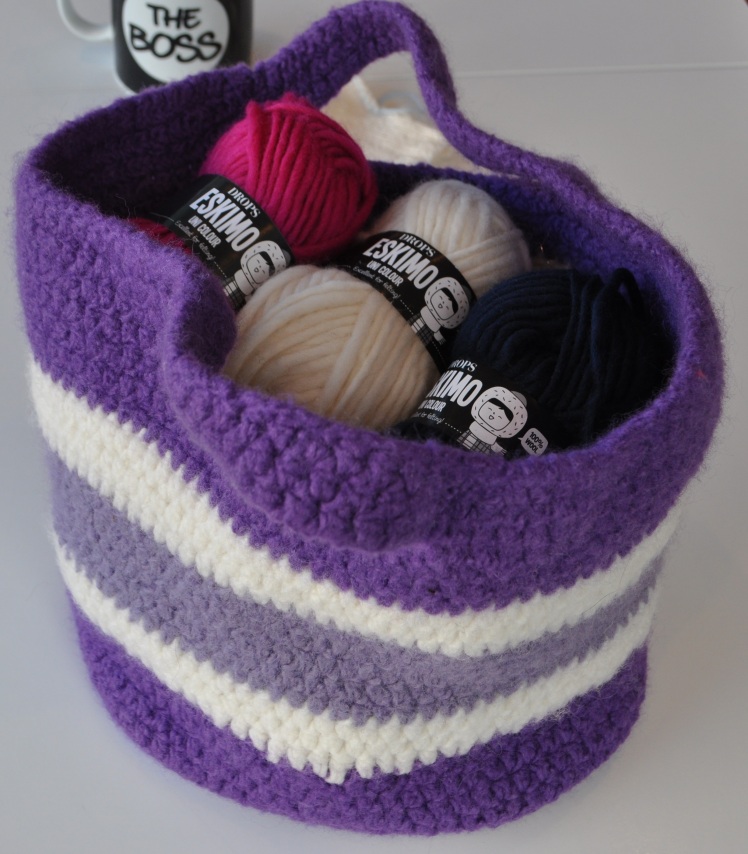 I love this yarn. When you felt it you need to stick it in your washing machine at 60 and put some detergent in. Make sure you put something else in as well, either towels or trainers, as the wool felts better if given a bit of aggravation!
Once felted you get a wonderful stiff fabric which is also slightly waterproof so you don’t need to line it! Bonus!
Materials
8mm hook
Drops Eskimo Orchid 200g
Drops Eskimo Medium Purple 100g
Drops Eskimo Off White 50g
Drops Eskimo – 50g, approx. 50m
Base of bag
Foundation : Ch 6
Round 1: Turn, ch1, 1htr into back loop of 2nd chain from hook. 1htr into back loop of next 4ch, 2htr in back loop of last ch, turn work, 1htr into other loop of last ch, 1htr into other loop of next 4ch, 2htr into final ch. Join with a sl st. (14sts) NOTE: the ch at the beginning of each round does NOT count as a st.
Round 2: ch1, work each st into the space BETWEEN the stitches NOT into the top of the stitch, work 5 tr, 3tr into next 2 spaces, 1 tr into next 5 spaces, 3tr in next 2 spaces. Join with a sl st. (22sts)
Round 3 – ch1, work 1st tr into same sp as ch, 1 tr into next 5 spaces, *2tr in next sp, 1 tr in following space* 3 times, 1 tr in next 5 spaces, *2tr in next sp, 1 tr in following space* twice, 2tr in final space. Join with a sl st. (28sts)
Round 4: ch1, work 1st tr into same sp as ch, 1 tr into next 5 spaces, *2tr in next sp, 1 tr in following 2 spaces* 3 times, 1 tr in next 5 spaces, *2tr in next sp, 1 tr in following 2 spaces* twice, 2tr in next space, 1tr in final sp. Join with a sl st (34sts)
Round 5 – ch1, work 1st tr into same sp as ch, 1 tr into next 5 spaces, *2tr in next sp, 1 tr in following 3 spaces* 3 times, 1 tr in next 5 spaces, *2tr in next sp, 1 tr in following 3 spaces* twice, 2tr in next space, 1 tr in next 2 spaces. Join with a sl st. (40sts)
Round 6: ch1, work 1st tr into same sp as ch, 1 tr into next 5 spaces, *2tr in next sp, 1 tr in following 4 spaces* 3 times, 1 tr in next 5 spaces, *2tr in next sp, 1 tr in following 4 spaces* twice, 2tr in next space, 1tr in final 3 sps. Join with a sl st (46sts)
Continue to work in this way increasing the number of trebles at the 6 points. This will also increase the number of trebles along each side. Work a total of 10 rounds. (70sts)
The base is basically a circle with 2 long sides. To keep the pattern correct, work the increases into the space of the increase from the previous row.

SIDES
Whilst working the sides you will change colour as follows:
Rows 1- 5 Orchid
Row 6 – 8 Off White
Rows 9 – 13 Medium Purple
Rows 14 – 16 Off White
Rows 17 – end Orchid
From this point you will now be working into the stitch rather than the spaces.
Round 1: ch1, 1tr into the back loop of each st all around the base. Working into the back loop helps to define the difference between base and sides, although some of the definition is later lost when felting. Place a stitch marker.
Round 2 – 4: Continue to work as a spiral without working a chain at the beginning of each round and without joining with a sl st at the end 1tr into each st around the bag. Move the stitch marker at the end of each round.
Round 5: This is the tricky part, Work 1tr into each st until you are at the point of the first corner, work 2tr into next st, *1 tr into following 9sts, 2tr in next st* rpt once more, 1tr into each st until next corner, work 2tr into next st, *1 tr into following 9sts, 2tr in next st* rpt once more, 1 tr into each st until end of round. (76sts)
Round 6 – 8: as round 2 – 4
Round 9: Work 1tr into each st until you are at the point of the first corner, work 2tr into next st, *1 tr into following 10sts, 2tr in next st* rpt once more, 1tr into each st until next corner, work 2tr into next st, *1 tr into following 10sts, 2tr in next st* rpt once more, 1 tr into each st until end of round. (82sts)
Continue to work in this way working 3 rows without increase and 1 row with increase until you have worked 20 rows. (96sts)
HANDLES
Due to the working nature of crochet the beginning of the row will “travel” so before proceeding, fold the bag flat to find the true sides of the bag. Place a marker at each end. You should have 96sts, with 48sts on each side.
Place a marker 16 sts from each end on both sides. This will mark the position of the handles.
Round 1: Working 1tr into each st until you reach the beginning of the handle. Ch 24, miss 16sts, work 1tr into next 32sts (this should take you to the next handle position) ch 24, miss next 16sts, work 1tr to end of round.
Work a further 2 rounds over these 112sts.
Break off the yarn. Work in all loose ends.
FELTING
To felt your bag you will need to wash it at 600 in a washing machine with a non-biological detergent and other items to cause agitation with the bag. A pair of trainers is very good for this!
Once washed DO NOT TUMBLE DRY!
Take the bag and pull it to shape. To help with the base of the bag, cut out a cardboard or flexible chopping board oval slightly larger than the base (only a couple of mm!) and push it down firmly so it is a tight fit. Pull the sides of the bag up and into shape. It may help to stuff the bag with old scrunched up newspaper etc. Leave the bag to dry naturally.
